
 |
| Zoom H1 on Canon 550D |
Historically, I've enjoyed dabbling in a bit of filming, but tended to buy separate still and video units (I had no choice in the early days). My experience regarding video includes a brief, but happy go of my parents old Super 8, I later used the very clunky VHS cameras of the late 80's (wow those were big units). However, most of my later work was using more compact 8mm Digital and later MiniDV, which were of Canon variety with reasonable 'acceptable' on-board sound. Essentially, in those days, unless you had a professional budget (thousands of pounds) it was always a make do experience regarding audio.
Enter DSLR with video, hooray!
Now with the advent of Digital SLR with High Definition (HD) video filming capabilities, personally I think that things have changed for the better. It's a great way to spend more on a stills camera and still get high end video recording capabilities, when you need it. Look at the lenses you can put on the front! Granted its always a compromise to a dedicated video camera, but as those that know, DSLRs typically require lugging a lot of heavy equipment (lenses, tripods, battery's etc) around, why would I want to add another film camera to that load? Sorry purists...
I agree there is a heap of functionality on film cameras that you just cant get on DSLRs, but I see this gap reducing every year. Most amateur film people can usually satisfy their needs with DSLR HD capabilities. I'll add that the newer Canon 650D has dedicated lenses with auto-focus built in for video recording specifically, but currently there are mix reviews on the performance and not something I have tested yet. There is also the Canon flagship EOS-1Dc model which can produce 4K video at 24 frames per second, so for those that can afford the hefty price tag, its quite an impressive capability for future proofing footage at cinematic quality!
That hiss can really be annoying...!
As mentioned earlier, sound takes a bit of a back seat (it is still very good compared with yesteryears, but you do need to buy a little more to get the best out of the units). The Canon 550D has a mono microphone (built in), which is not bad for close-up indoor work (particularly vocals), but I prefer a more stereo immersive experience to get the best out of certain shots, particularly for landscapes. What to do...? I've been experimenting with getting good stereo sound on my Canon 550D for a while, and have been trailing the Zoom H1 for over 2 years. It's a very lightweight and convenient way of getting pretty good pro-level stereo audio.
Why the Zoom? When I bought this unit, solutions for stereo recording were rather limited, especially on a budget, particularly if you did not want to add a big heavy item of extra equipment to you camera or bag. So the Zoom fitted nicely. With some DIY custom made attachments for a mounting system, I now find this fits very well on top of the camera using the flash shoe. I don't use sound damping (the microphone suspended in a rubber cage to isolate camera body noise from microphone) as I mainly shoot on a tripod. I also want to be able to take the camera in and out of a camera bag easily with the zoom attached, much more difficult with a large dampening system included. However, I confess it's an extremely difficult technique to master, however, using smooth gentle movements, without bumping or rub your hands over the body of the camera will keep rattles from minimal to non existent (it comes with practice). Using the built in 100Hz cut-off (low-pass filter) will help with the bumps, as will reducing the gain a little, the later is a bit of a 'fudge'. Also, remember to turn of the built in lens anti-shake lens technology on the camera lens, which can make a horrendous noise on the audio - you really don't need it on a tripod.
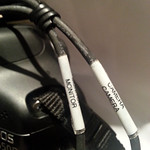 |
| Sescom cables |
The tricky bit is interfacing a headphone out socket, on the Zoom, to a 3.5mm microphone in socket on the Canon 550D. These are different audio level. Fortunately, I did some research, and there is a very handy L-pad available (which saves making your own), it's 25db attenuation cable just for this purpose, made by Sescom. The fiddly part is setting the level output from the Zoom to the input on the camera (make sure the cable is the connected firmly and in the right order - it is marked).
Turn off the cameras automatic gain...
The Canon 550D has built in automatic gain, that just cannot be turned off in stock firmware. This is known as AGC or Automatic Gain Control. The built in microphone, typically, is very happy with this setup, it works very well for closeup indoor work, but once you use an external microphone this can introduce a lot of unintended noise. Essentially the camera electronics ramps up the sensitivity during moments of quiet - and you can say hello to hiss again...
There are many posts and tips on the web including feeding a high frequency noise simultaneously into the jack while recording audio. This tricks the auto gain to back right down. It works, but its not the most elegant - as you need to attach an MP3 player outputting a 20kHz frequency - it also means complicating your ability to capture stereo sound, as you have to use at least one of the channels to introduce the 20Khz signal.
My favorite solution is to use the Magic Lantern firmware, which adds the ability to turn off the auto gain! Thank you Magic Lantern! Of course you use this at your own risk. It is pretty much a tried and test tweak these days (rather than a hack), but I always recommend reading the articles on the site very carefully, before going down this route! It contains a modified firmware (well it is actually minor firmware tweak to allow access to the Magic Lantern software running on your now bootable SD card). It has many other settings that are normally only available on pro level cameras, so it is very desirable for may budding Spielbergs. Some settings work in conjunction with the original Canon menu - the pro level ones are available on the Magic Lantern menu. It's a whole new learning curve. You may also want to wait for your camera to be out of warranty, you have been warned... ;)
Balancing audio
There are three things to consider:
- Setting the sensitivity on the camera (tweaked by Magic Lantern),
- the headphone out on the Zoom
- and the Microphone sensitivity.
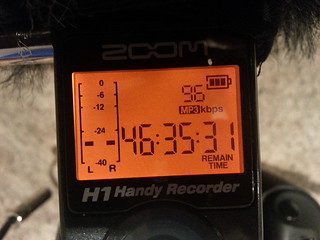 |
| Zoom H1 LCD illuminated |
Record directly to the Zoom
Don't forget that the Zoom can also record audio to its own dedicated SD card, so there is nothing stopping you from recording to both at same time. I usually do both on important recordings just in case I get the levels wrong on the camera. A handy tip - remember the old film clapper boards? - use one of those or even simple clap your hands, so there is a noticeable spike in the audio to match later (wait for the clap echo to fade - then start talking). The advantage of recording audio to the Canon 550D while simultaneously recording to the Zoom is that audio matching and or recovery later is much easier. If you get the audio settings wrong on the Canon input you can still use the audio recorded on the Zoom... This may also be a viable option for those not wanting to use the cable link, and or wishing to mount the Zoom on a tripod closer to the sound source (remember that too much distance with no cable connected will mean there is a slight delay in the clap from camera to microphone making the lip syncing a little more fiddly, in long recording.
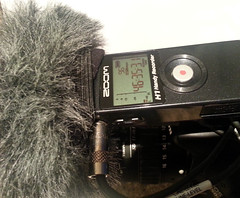 |
| Zoom H1 with record button on top |
Other microphones
If it has a 3.5mm jack, this can be connected directly to the camera. I would use Magic Lantern (a non standard firmware development) to allow adjustment of the gain to match your microphone. You may find that later Canon models have manual controls built in, but the 550D does not. I'm afraid which microphones to go for is very much trial and error. Cheap does not always equate to good sounds, and long cable runs will likely mean noise gets introduced into the camera, you may need to invest in some high quality cables. However, look at the product reviews and see how others have got on with them, if it has a good consumer rating, the chances are you are onto a good buy. Alternatively, speak with an audio professional, or your Learning Technologist for advice.
Enjoy your audio.
Nice post
ReplyDeleteThank you! :)
Delete